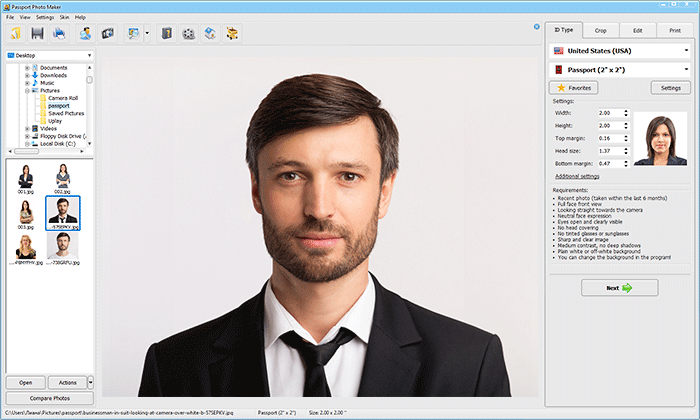
Ditch the studio expense and say cheese from your couch! Taking passport photos yourself is totally achievable, and mastering the art at home even saves you time and hassle. No more navigating lines or stressing about picture-perfect smiles under harsh studio lights. This guide unlocks the secrets to DIY passport photo success, revealing lighting tricks, background hacks, and pose pointers to ensure your official snap gets a big thumbs up at the passport office.
Choosing the Right Background
The selection of an appropriate background is a critical element in the process of capturing DIY passport photos. Passport regulations universally emphasize the need for a simple and unobtrusive backdrop. Opting for a plain, light-colored background is highly recommended, with popular choices being white or light gray. This deliberate choice ensures that the focus remains solely on the subject’s face, facilitating facial recognition software and complying with the stringent standards set by passport authorities.
The rationale behind using a neutral background lies in its ability to eliminate distractions and maintain a professional aesthetic. Textured or patterned backgrounds can introduce unnecessary complexities and may result in the rejection of your photos during the application process. Hence, it is imperative to adhere to the simplicity of a solid backdrop to ensure your passport photos are not only visually pleasing but also meet the necessary official requirements.
The background’s role goes beyond mere aesthetics; it contributes to the overall security and functionality of the passport. By choosing a background that contrasts with the subject’s features, such as their hair and clothing, the facial details become more pronounced and distinguishable. This deliberate contrast aids in the accurate identification of the individual by the authorities, a key consideration in the era of heightened security protocols.
Furthermore, understanding the specific requirements of the passport-issuing authority is crucial. Some countries may have variations in background color preferences or specific dimensions that must be adhered to. Therefore, it is recommended to familiarize yourself with the guidelines provided by the relevant authorities to ensure that your DIY passport photos align with the stipulated standards.
Setting Up the Right Lighting:
Creating DIY passport photos involves meticulous attention to lighting, a factor that significantly influences the clarity and quality of the final images. The goal is to achieve well-exposed, evenly lit photographs that showcase the subject’s facial features without introducing harsh shadows or overexposure. Here’s a detailed exploration of setting up the right lighting for your DIY passport photos:
Natural Light vs Artificial Light:
- Natural Light: Whenever possible, utilize natural light sources for passport photos. Position yourself near a large window where diffused sunlight can illuminate your face evenly. Natural light provides a soft, flattering glow that minimizes harsh shadows.
- Artificial Light: In situations where natural light is unavailable, opt for artificial lighting. Use soft light sources, such as a ring light or diffused LED lights, to replicate the even illumination provided by natural light.
Positioning and Angle:
- Avoiding Shadows: To prevent shadows on the face, position the light source in front of you. Ensure that the light is diffused to soften its intensity. Shadows, especially around the eyes and nose, can hinder facial recognition and should be minimized.
- Eliminating Glare: Position the lights at a slight angle to the camera to reduce glare on eyeglasses if worn. This minimizes reflections that can obscure the eyes, a crucial aspect of passport photos.
Consistency and Balance:
- Consistent Lighting: Maintain consistent lighting across the entire face to ensure uniformity in the photograph. Any uneven lighting can create variations in facial tone, potentially leading to the rejection of the photos.
- Avoiding Overexposure: Adjust the intensity of artificial lights to avoid overexposure. Overly bright photos can obscure facial details and may not meet the stringent standards set by passport authorities.
Table for Reference:
| Lighting Aspect | Recommendations | Additional Tips |
| Light Source | Natural light from a window or diffused artificial lighting | Consider the time of day for optimal natural lighting |
| Positioning | In front of the subject to minimize shadows | Use a reflector to fill in shadows if necessary |
| Angle | Slightly angled to reduce glare on eyeglasses (if worn) | Test different angles to find the most flattering one |
| Consistency | Maintain even lighting across the entire face | Check for any unwanted shadows during the photo session |
| Intensity | Adjust artificial light intensity to avoid overexposure | Conduct test shots to determine the ideal light level |
Setting Up and Positioning the Camera
Setting up and positioning the camera for DIY passport photos is a crucial step that goes beyond simply having the right equipment. It involves considerations related to resolution, stability, positioning, and framing to ensure that the resulting images comply with the stringent standards set by passport authorities.
- Resolution and Camera Settings: Ensuring your camera is set to a high resolution is paramount for capturing clear and detailed facial features. Passport photos often have specific requirements, so be sure to check the resolution standards outlined by the passport-issuing authority. Additionally, adjust your camera settings to capture high-quality images. Choose the appropriate image quality and format (JPEG or RAW) to retain essential details during post-processing.
- Use of Tripod: The use of a tripod is essential for camera stability. It eliminates the risk of camera shake, ensuring that your photos are sharp and focused. Stability is particularly crucial for passport photos, where precision and clarity are non-negotiable. A tripod also contributes to consistency in framing and composition across multiple shots, facilitating the selection of the best photo.
- Camera Positioning: Position the camera at eye level with the subject. This not only captures a natural and accurate representation of the face but also prevents distortion and provides a standard viewpoint. Maintaining a recommended distance of around four feet between the camera and the subject is crucial. This distance ensures that the face occupies the required percentage of the frame, meeting the specifications outlined by passport authorities.
- Framing and Composition: Adhere to official guidelines regarding head size and position within the frame. Passport regulations often specify that the head should be centered, facing forward, and occupying a certain percentage of the total frame. Consider using the rule of thirds for composition, positioning the subject’s eyes along the upper horizontal line to maintain balance within the frame.
- Testing and Adjustments: Before capturing the final photos, take several test shots. This allows you to assess factors such as lighting, framing, and composition. Pay attention to details like facial expressions and ensure that the camera settings are optimized for the best results. Making necessary adjustments during the testing phase contributes to the overall quality of the DIY passport photos.
Dress Code and Grooming
While the technical aspects of capturing DIY passport photos, such as lighting and camera positioning, are crucial, attention to dress code and grooming is equally important. Passport authorities have specific guidelines to ensure uniformity and ease of identification. Here’s a closer look at the considerations for dress code and grooming:
- Clothing Choice: Selecting the right clothing is vital for passport photos. Passport regulations often stipulate a dress code that requires individuals to wear clothing in solid, contrasting colors against the background. It is advisable to choose colors like black, dark blue, or neutral tones, avoiding patterns or overly bright colors that could distract from your face. The goal is to create a clear distinction between your clothing and the background to facilitate accurate facial recognition.
- Avoiding Accessories: Passport guidelines usually recommend minimalism when it comes to accessories. Avoid wearing items such as hats, scarves, or large jewelry that could obscure your face. The focus should be on presenting a clear and unobstructed view of your facial features. If you wear prescription glasses, ensure that they do not cause glare, and it’s often recommended to remove them for the photo unless they are required for medical reasons.
- Hair and Facial Hair: Maintaining a neat and natural appearance is crucial for passport photos. Ensure that your hairstyle allows your face to be fully visible, and avoid hairstyles that cast shadows on your face. If you have facial hair, ensure that it is well-groomed and does not obscure any part of your face. The goal is to present an accurate representation of your features, making it easier for authorities to verify your identity.
- Expression and Gaze: Passport photos require a neutral facial expression with a closed mouth. Avoid smiling, frowning, or any exaggerated expressions. Keep your face relaxed and maintain a natural gaze directly into the camera. This standard expression helps authorities in accurately matching your photo with your actual appearance.
- Dress Code for Special Circumstances: In some instances, individuals may be allowed to wear religious or cultural attire as long as it does not cover the face and adheres to specific guidelines. It’s crucial to check with the passport-issuing authority for any exceptions or additional requirements related to dress code.


